sourdough starter


In order to get my sister and I to finish every single grain of rice in our bowls, my grandmother used to tell us that leaving rice grains would mean our future husbands would be ugly. “What do you mean ‘ugly’, grandma?” we asked. “Lots of pockmarks. Or freckles. Or both!” exclaimed my grandmother.

Unfortunately for my grandmother, marrying yucky boys was the last thing on our minds. So she quickly revised her strategy: not finishing all your rice would mean we would grow up with lots of freckles! Yikes! From then on, not one grain of rice was seen in anyone’s rice bowl. Funny thing is, little did she know that we would one day grow up and live in a country where people actually think freckles are cute!

(I hope I’m not giving anyone the impression that my grandmother was cruel because she was the sweetest and kindest woman. She just had a funny strategy of asking us to finish our dinner.)

Thanks to my grandmother’s efforts, the philosophy of not wasting food is now permanently etched in my brain. So, what does that have to do with flatbread? If you’ll remember (from what seems like ages ago), the creation of a certain sourdough starter (admit it, you thought I killed it already, didn’t you!) and its continual maintenance (ha! but I didn’t!) generate enough leftover starter that I can feel the onset of freckles just from thinking about dumping it in the trash.

What to do … what to do? Thanks to a recipe from breadtopia, slight modifications, and an expectation of something more like flatbread than a fluffy pizza, not one grain(?) of wheat will go to waste!

(more…)

Sourdough Loaves

Finally I’m going to tell you about how I used the Sourdough Starter I started over a month ago!

First off, I have to be honest that I didn’t really think the whole thing would work because it just seemed to me that so many things can go wrong: didn’t use the right amount of flour or water, temperature not optimal, contamination by other yucky organisms, etc etc. I literally thought of every possible thing that could have gone wrong, just to prepare myself to not get disappointed when it failed. But the sourdough gods must have been smiling on me because not only did I manage to get a decent starter going, but the bread that I eventually made with the starter turned out quite good!

Bread-making is obviously not for people who are impatient, as it requires long stretches of waiting. At the same time, it is also one of the least labor-intensive type of cooking one can do, especially if one owns a stand mixer. You literally mix up the dough, knead it for a while, leave it alone while you go do something else, quickly shape the loaves, leave it alone again, and bake.

Prepping Sourdough Loaves

This time around, I tried out a schedule that ended up working quite well. I mixed the dough on a late Saturday afternoon and then left it to rise overnight in my cool kitchen. By the time I woke up on Sunday morning (left panel), it had risen about 2 to 3 times its initial volume (marked by the pink tape) and was ready to be shaped into loaves. It took all of 15 minutes to shape the dough into two batards (middle panel), after which I went out and ran some errands for a few hours. By the time I came back, the loaves had puffed (right panel) and were ready to be baked.

The final result had plenty of big holes – my simplistic metric for “good” bread – and a pretty authentic, tangy flavor. Nathan devoured half a loaf within the span of 30 minutes, so I’d venture to say the bread was a success! ;)

(more…)

Sorry it’s taken me so long to finish the Sourdough Starter saga, but I’ve been busy with various grad school matters, including preparing for a thesis committee meeting. Don’t worry, I’ll spare you the details of that and get right to what really matters. And that would be my lovely starter.

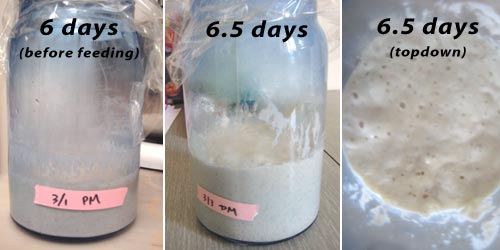
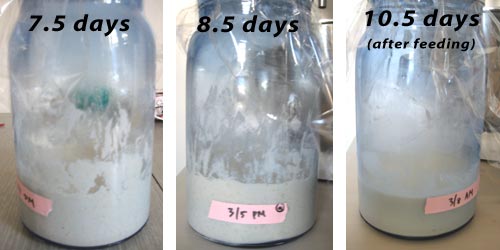
In Part 2, we left off at 10.5 days. I had missed the feeding at 10 days due to getting home too late from Nathan’s thesis talk celebration and figured I would wait until the morning (10.5 days) to feed it. The next morning, we were scheduled to leave for an overnight camping/barrel-tasting trip, so I quickly fed the starter and took off for sunny wine country.

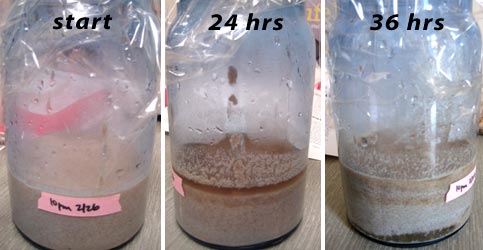
When I got back the next night (12 days), though, nothing had happened. No rise, no foaminess, nothing! I didn’t even take a picture of it because it literally looked exactly like the picture at 10.5 days. Did I kill it? Is it mad at me for being lazy and negligent? Am I a terrible starter mom? Instead of throwing everything out and restarting from scratch, though, all the books and internet forums I read said to just keep on feeding the starter and see if it comes back. There were claims that “most of them do”, which I found skeptical, but I gave it a try anyway. So I fed the starter with the same recipe (1/2 cup warm water, 2/3 cup bread flour, 1/4 starter) that night (12 days).

Starter 6

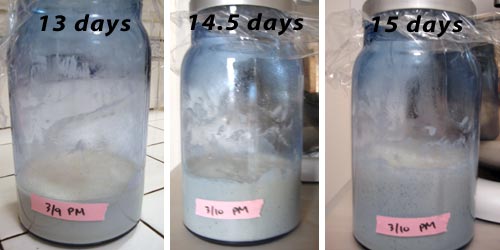
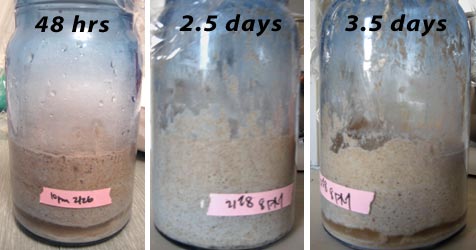
The next night (13 days), there was still no rise or bubbliness. I fed it again and decided to give it a couple more days. Reasoning that I should let more yeast accumulate, I didn’t feed it the next night (14 days). Lo and behold, the next morning (14.5 days), the starter has risen a little! Is it coming back to life??

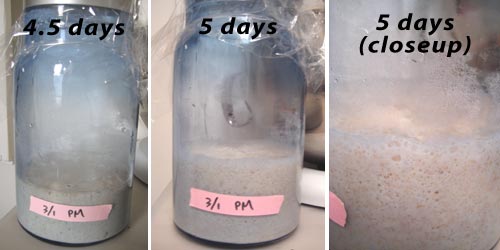
Coming home from work (15 days), even more bubbliness and foaminess greeted me and I decided to no longer be so skeptical about the internet, at least as far as bread-baking is concerned. I fed it that night (15 days) and went to bed.

Starter 7

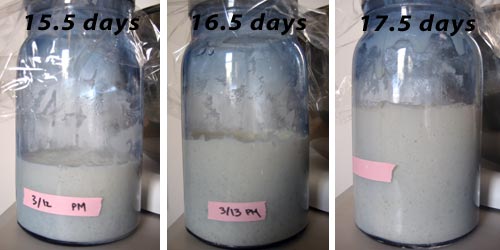
Check out the doubling in a mere 8 hours, at 15.5 days! From what I’ve read, if a starter is able to double or triple its volume and fall back within a 24 hour period, then it’s ready to be used. And it was looking like my starter is almost at that stage! That night (16 days), I fed it again and the next morning (16.5 days), it was able to rise even higher than the previous day, almost tripling its own volume. Awesome!!

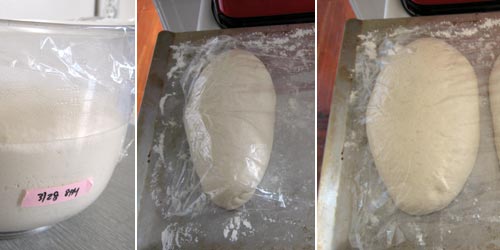
The final step before using the starter in a bread recipe is to scale up because you usually need more than a cup of starter to make bread with. So that night (17 days), I did a bigger feeding – 1/4 cup starter, 1 cup water, 1 1/3 cup bread flour. The next morning (17.5 days), the starter doubled its volume and it was all ready to help me rise some bread!

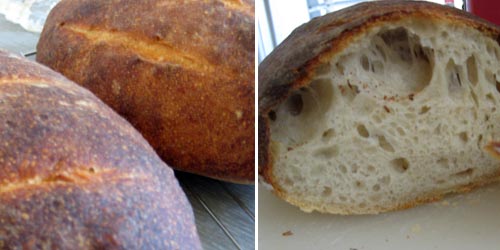
I used 1 1/2 cup starter to make bread (to come in another post) and saved 1/4 cup to keep the starter going. Since I don’t plan on baking every day or even every week, I used the same recipe as for a feeding, mixed everything in a glass jar, loosely covered with plastic wrap and stuck the whole thing in the fridge. Supposedly, once in the fridge, you should only have to feed the starter once a month or so, although obviously, the more often you use it, the more “vigorous” it will be.

In my case, I kept mine in the fridge for 2 weeks without touching it before deciding to bake more bread. I took it out of the fridge, fed it with the normal recipe, and left it at room temperature for 24 hours. If the starter is able to double or triple its own volume and fall back within that period, then it’s ready to be scaled up for bread. If not, feed again and wait another day.

Part 2 of the Sourdough Starter saga begins with hope but ends with possible tragedy. Sounds exciting, no? Well, let’s get to it.

If you remember, we left off the story at 3.5 days, after the first feeding. At the end of the 4th day, I fed the starter again, switching to white bread flour this time. I’ve found what works best for me is to first pour all of the starter out into a bowl, which then allows me to rinse off the starter jar well with hot water (to semi-sterilize it) followed by a quick, cool rinse (since we don’t want to kill the yeast). Next, I add in 1/4 cup of the old starter and 1/2 cup of lukewarm water, stir it well with a wooden spoon, dump in about 2/3 cups of bread flour, and stir until the whole thing looks like thick pancake batter. I use a spatula to scrape down the sides of the jar, loosely cover with plastic wrap, and leave the whole thing out on the counter.

Starter 3

After a feeding, the starter doesn’t look all that interesting. But 12 hours after/the next morning (4.5 days), I started to see some activity! That same night (5 days), the starter even doubled itself — definitely a good sign, I think! From the closeup, you can see how bubbly and frothy the whole thing got.

Starter 4

Since I’m roughly following the instructions from the Cheeseboard Cookbook, I’ve been scheduling the feedings 2 days apart. Right before the next feeding (after 6 days), the starter had fallen back to about its original volume after being crazy frothy just 24 hours ago. I stuck my nose over the top of the jar and instead of just doughy smells, I started detecting hints of sourness. Woo!

After 6 days, the starter got treated to another feeding and 12 hours later (6.5 days), it was happy and bubbly/puffy/frothy again! Peeking over the top of the jar, I even saw big ol’ bubbles on the surface. Seems like we’re well on our way…

Starter 5

Things looked pretty much the same for the next couple of days. At 7.5 days (roughly 36 hours after the last feeding), the starter had finished rising and had fallen down again. At 8 days, it got fed again and 12 hours after that (8.5 days), more bubbliness!

Now, here is where I have to confess. As you can see, I missed a photo of day 9 but I can tell you that it looked pretty similar to the 7.5 days one. Even worse than slacking with the documentation, though, was slacking off with the feeding. Nathan’s thesis talk celebration coincided with the day 10 feeding, i.e. I got home too late to want to deal with feeding the starter. So I thought to myself, I’m sure it’s ok to wait until morning…which is what I did. I know, shame on me! Will this be the demise of the starter? *cue ominous music*

(To be continued…)

I have a giant list of projects I keep saying I’ll do one day, but the truth is that list only seems to grow longer and never all that much shorter. Here are a few select items off that list: learn to crochet, make a bunch of pretty origami boxes for strings of Christmas lights (stolen idea after visiting a friend’s house), turn our coffee table into a light-table (joint project with Nathan), etc.

Last Tuesday, in an attempt to cross another thing off The List, I finally decided to stop talking about starting a sourdough starter and actually do it. After sifting (ha! get it?) through my cookbooks, the forums over at The Fresh Loaf and multiple random websites courtesy of Google, however, I was filled with contradictory advice and information. Should I use white flour, wheat flour, or rye flour? How often do I need to feed the starter? Do I need to use bottled water? Can I stir with a metal spoon? Do I need to use a kitchen scale to weigh out everything? Ahhh!

In the end, I had a revelation. Ok, maybe I shouldn’t call it a revelation yet since I haven’t proven that it actually works. So let’s say, I had an idea. Sourdough starters are not new; people have been making them for a long time, probably long before kitchen scales and measuring cups were common. This leads me to believe that you probably don’t need super-exact measurements to get one going. So I just went for it.

I grabbed a cup of whole-wheat flour and mixed it with a cup and a bit of warm water (Brita-filtered from the tap), making a “batter” that’s like thin pancake batter. I poured it into a glass jar, loosely covered the top with plastic wrap, marked the level with tape, and left it on the kitchen counter.

Starter 1

After 24 hours, I saw a layer of dark liquid on top, which is apparently called the ‘hooch’. Another 12 hours later, the hooch had settled to the bottom of the jar.

Starter 2

You can see in the pictures that after 48 hours total, the starter had risen quite a bit. At this point, I did the first feeding – which just meant pouring out half of the starter and mixing the leftover with another 1/2 cup of warm water and a little less than 1/2 cup of whole-wheat flour. You can probably use white flour too, but I have this huge bag of wheat flour in the fridge, so I thought I’d go crazy and use more wheat. The starter after this first feeding was a bit thicker than what I started with two days ago.

Another 12 hours later, the starter had risen more again and by 3.5 days, more hooch. Up to this point, the starter smelled mostly like fresh, yeasty dough. There were also bubbles inside the starter and the top surface was slightly foamy and bubbly.

(To be continued…)